Systematic waveform debug method
When a test fails, most designers panic-scroll waveforms hoping to spot the bug. A systematic method — first fail → hypothesize → targeted waves → root cause — finds bugs faster and teaches you to predict where they'll hide next time.
Never open the waveform viewer without a hypothesis. The failure message tells you what broke and when. Your job is to figure out why — and waves are evidence, not a fishing expedition.
The 5-step debug loop
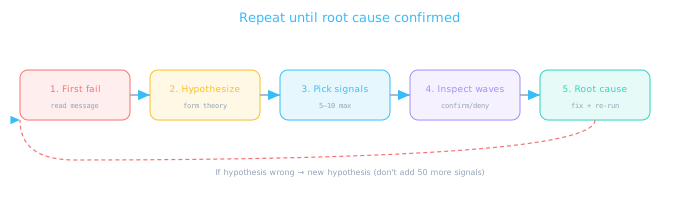
Discipline beats random scrolling. Each loop should take minutes, not hours.
| Step | Action | Output |
|---|---|---|
| 1. First fail | Read the first FAIL line, not the summary | Time, signal, expected vs actual, test name |
| 2. Hypothesize | "I think X happened because Y" | One-sentence theory written down |
| 3. Pick signals | Choose 5–10 signals that prove/disprove Y | Minimal wave list |
| 4. Inspect | Zoom to failure time ±10 cycles; check theory | Confirmed or denied |
| 5. Root cause | Fix RTL or TB; add regression test; re-run | All tests pass; bug can't return silently |
Step 1 — read the first failure
Extract four facts from the first FAIL line:
- Test name:
T04_backpressure— which scenario? - Signal:
result(implied by "got/expected") - Values: got 15, expected 10 — off by 5
- Time: t=450 — where to zoom in the waveform
Chasing the last failure often leads you to a downstream symptom. The first failure is closest to the root cause. Fix T04 first — T06 may disappear on its own.
Step 2 — hypothesize before opening waves
Write your theory in one sentence. Examples for common failure patterns:
| Symptom | Likely hypothesis | Signals to check |
|---|---|---|
| Result off by N | Stale operand latched; partial result not updated | s_valid, s_ready, a, b, stage regs |
| Output is X | Uninitialized register or multiply-driven net | rst_n, reg init, driver count |
| m_valid stuck high | Backpressure not clearing output stage | m_ready, s3_valid, stall |
| Wrong after reset | Reset doesn't clear all state elements | rst_n, all regs at reset edge |
| Intermittent pass/fail | Race between NB assignment and TB sample | @(posedge clk) vs #1 delay |
Discipline check: if you can't write a one-sentence hypothesis, you don't understand the failure yet. Re-read the test code and the spec before touching waveforms.
Step 3 — signal hierarchy navigation
Simulators show signals in a hierarchy tree. Learn to navigate it — don't flatten everything into one view.
pipe_alu_mul_tb                    ← testbench (stimulus + checker)
  ├── clk, rst_n                   ← start here for timing context
  ├── s_valid, s_ready, a, b, op   ← stimulus signals
  ├── m_valid, m_ready, result     ← output to check
  └── dut                          ← design under test
        ├── s1_valid, s1_a, s1_b   ← stage 1 internal (if not hidden)
        ├── s2_valid, s2_partial   ← stage 2 internal
        ├── s3_valid, s3_result    ← stage 3 / output stage
        └── s_ready (internal)     ← back-pressure logic

Debug strategy:
  1. Confirm inputs at failure time (TB side)
  2. Walk into dut — which stage has wrong data?
  3. Compare stage N output vs stage N+1 input
  4. Bug is in the stage where they diverge
Top-down
Start at outputs, walk backward. "result is wrong → s3_result wrong → s2_partial wrong → s1_a was stale."
Time window
Zoom to failure time minus pipeline latency. A 3-stage pipe: look 3 cycles before the wrong output.
Markers
Place a marker at the failure time. Scroll inputs and internals relative to that marker — not from time 0.
X tracing — finding the source of unknowns
An X (unknown) on a critical output is one of the most common debug scenarios. X propagates forward — find where it starts.
// Step 1: Find FIRST time signal becomes X
initial begin
  @(posedge clk);
  forever begin
    @(posedge clk);
    if ($isunknown(result) && !rst_n) begin  // guard: only after reset
      $display("X detected on result at t=%0t", $time);
      $display("  s3_result = %b", dut.s3_result);
      $display("  s2_partial = %b", dut.s2_partial);
      $display("  s1_a = %b, s1_b = %b", dut.s1_a, dut.s1_b);
      $stop;  // pause sim for waveform inspection
    end
  end
end

// Common X sources (check in this order):
// 1. Register not initialized on reset
// 2. Net driven by two sources (multi-driver)
// 3. Array index out of bounds → X read
// 4. Case statement without default → latch inference
// 5. TB samples before NB assignment settles
Don't confuse expected X during reset with a bug. Guard your X-tracer with if (rst_n) or start checking only after the reset sequence completes.
Step 5 — fix, regression, prevent recurrence
Bug log entry template:
  Test:     T04_backpressure
  Symptom:  result=15, expected=10 at t=450
  Hypothesis: s3_result not held during m_ready=0
  Root cause: s3_valid cleared when m_ready low (should hold)
  Fix:      stage3_finish.v line 42 — remove "else if (m_ready) s3_valid <= 0"
  Regression: T04 still passes; added assertion p_valid_hold (lesson 10.3)
  Coverage: backpressure cross bin now hit
Worked example — pipeline latency mismatch
A classic debug scenario: TB checks result too early because it forgot pipeline latency.
// SYMPTOM: FAIL got 0 expected 30 at t=65
// HYPOTHESIS: checking result before 3-cycle pipe fills

// WRONG — checks immediately after drive
drive_op(10, 20, ADD);
check_result(30);  // FAIL: pipe hasn't finished yet

// CORRECT — account for latency
drive_op(10, 20, ADD);
repeat (3) @(posedge clk);  // wait pipeline depth
check_result(30);  // PASS

// Waveform debug confirms:
// t=55  s_valid=1, data accepted into S1
// t=65  still in S2 — result NOT valid yet  ← failure was here
// t=75  m_valid=1, result=30               ← correct sample point
Anti-patterns to avoid
- Waveform fishing: adding 50 signals with no hypothesis. Start with 5.
- Scrolling from t=0: jump to failure time first, then expand the window.
- Fixing symptoms: changing the TB expected value to match wrong output. Fix the RTL.
- Skipping regression: a fix for T04 breaks T01. Always re-run the full suite.
- No assertion added: if a bug escaped once, add an assertion so it can't escape again.
Module 10 checkpoint
- Build a self-checking testbench with clock, reset, checker, and PASS/FAIL report
- Write a test plan table and implement directed corner-case tests
- Add immediate and concurrent SVA assertions for protocol invariants
- Understand code vs functional coverage and what 100% line does NOT mean
- Debug failures systematically: first fail → hypothesize → waves → root cause
- Trace X values to their source using hierarchy and time markers
- Document bugs and add regression tests + assertions to prevent recurrence
Module 11 is next: I2C & Serial Protocols. You'll apply everything from Module 10 to a real open-drain bus — self-checking TB for SDA/SCL timing, directed tests for NACK and clock-stretch, assertions on start/stop conditions, and waveform debug when the slave doesn't ACK. Protocol verification is where RTL design meets the outside world.
🎯 What to remember
- Read the first failure — it is closest to the root cause.
- Hypothesize before opening waveforms; pick 5–10 signals, not 50.
- Navigate hierarchy top-down: outputs → internal stages → inputs.
- Trace X to its origin; guard checks until after reset completes.
- Every bug gets a fix, a regression test, and ideally an assertion.